Tuesday, 22 January 2013

'Snow day like a snow day!

I am aware that my ability to create puns has diminished somewhat lately, but I digress...

As many of you are no doubt aware it has been snowing recently, which in my opinion is excelent!

It also gives me an excuse to unveil two mini projects I have been having fun with...

1. My Chewbacca hat.

I received a Chewbacca "snood" from my fiance's parents at Christmas, so before the cold weather set in I decided to transform it into a sort of Russian hat, or Kashyyykian hat...


Note - Chewbacca is a Wookiee, Wookiees come from Kashyyyk.

After modifying the hat I decided to wear the removed scarf parts as Wookiee arms for a few hours...

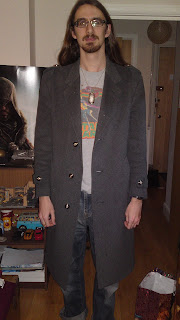
2. To complete my winter look I then purchased a new (second hand) coat.

This was for two reasons, firstly we had another dress up day at work so I decided to be Scrooge with an old man jacket, pyjamas and top hat, and secondly as my old coat had disintegrated slightly after 8 years of constant use...

After costume day at work (which was similar to being steamed thanks to the heating being fixed and this being a particularly good winter coat) I went to a tailor nearby and asked them if they could edit it for me; the coat is a thick old trenchcoat with an open V shaped collar and I wanted a closed collar, new buttons and little decorative bits like shoulder pads to make it look a little more like an 18th Century Military uniform, but with a personal twist...

The nice women in the shop ran up a total and gave me a price estimate, and so of course I went home and began to plan how I was going to do it myself.

Unfortunatley I don't have any "before" images as I just launched into it and completed the entire thing (Chewie Hat and Coat) in 2 days...


These top two images show the coat as it was, an open collared coat. The buttons are all new, as are the cuffs and shoulder pads.

The next image shows the coat when all of the buttons are done up.


The top button is hidden under the right lapel which functions as an actual button, the second button down however is concealed under the left lapel and is purely for decoration so that I always have access to my inner pocket without the need to unbutton my coat... "form and function" as my Product Design Tutor used to say...

Here are some images of me in my new creation:


And here's a picture of me with both items on...


And so, geared up in my Kashyyykian hat and Epicoat we ventured out into the snow to make a snow dog together, and here she is, "Harriett Dinky Snowling"...


Merry Snow Day Everyone!

VIKINGS!!!

At work we are doing a few new activities and fancy fixtures to inspire creativity in visitors, one of these was a volcano, and another was a Viking Longboat, so naturally this challenge fell to me...

Using only paper I made a simple to make Viking Longboat and (hopefully) easy to follow instructions as well as a little watery shelf display and two simple flat Vikings...
Here are some pictures:


This is my tiny prototype model which I made in a few hours after work.
After getting the go-ahead on the design I quickly made the final ship (which is 3 times bigger, just a bit longer than A4) and two little Vikings...


I took the boat into the store where it was decided that it needed a base, or at least something to sit on like foamboard... and so, the following evening I made this...


These are now on display in the Hobbycraft in Maidstone!
I also made a little paper me (using my Make-a-Me template) which is pinned to my front with a little chalkboard, but I forgot to take pictures... plus he is currently in a locker...

Here's a flat version:


More on that later...


Probably.

In the mean time, here's a rather nifty link to the instruction sheet for the LongBoat!

http://alexsnowling.blogspot.co.uk/2013/01/the-mighty-viking-longboat.html

Monday, 31 December 2012

Two months later...

It has been around two months since my last Blog entry, so, what have I been doing you ask?
 
Well, I shall begin with a Birthday;
 
At school I had the honour of befriending a chap named Craig whom I made a fake radio station with called "Chipmunk FM".
 
As he lost his recordings of CMFM I thought a nice present might be a Definitive Edition of the show, and here it is:


Next up, a Wedding;
 
As you may remember I made a post here a while back saying that I was making a cake topper for my sister's wedding... if you don't remember, shame on you.
 
If you do remember, here, have a reward in the form of some images of my process:
 
I would like to point out that this isn't all of it, I did start out with a paper one, then moved on to coloured FIMO clay which I did'nt get on with all too well, and then moved on to my trusty old friend Grey Sculpey... and so, here is some behind the scenes bits...
 
 
These are some initail armatures that I made for the coloured FIMO, this is before I had decided to work with Grey Sculpey, and even though I didn't use these they helped me to work out the basic shapes for the figures.
 
 
This is a very early model made from Sculpey Grey, strong enough to not really need an armature.


Various stages of modelling, and then the happy couple in the oven...
 
 
All that was left now was to paint them, and for this I used a basic acrylic...
 
 
This is after applying some basic skin tones and the first layer of white... a few hours later and...


And just so that you can judge the likenesses, here are some photos taken at the wedding:


And did I mention I was also official photographer at the wedding?
 
Obviously not in that bottom image though as I am clearly in that one...
 
And last but not least, a Courtesan;
 
If you follow my Blog regularly you will no doubt have seen my Fiora Cavazza model, and read about my plan to make an action figure of her in the future...
 
Well, you will be glad to know that I have been working on it some more!
 
Sadly I had to stop a while back because I accidentally chiselled my hand instead of the model, and then the above happened, so this project was halted somewhat...
 
Here is what I have so far:
 
 
There's still a long way to go, but it's an okay start...
 
The vast majority is carved out of the existing figure (a Battlestar Galactica figure) with faux leather sewed on.
 
Acrylic seems to work nicely on the leather without compromising it's movement, so I hope to just paint it once she's all carved.
 
I also took some photos of existing Assassin's Creed figures for a chap on eBay who gave me a rather good deal on the base you see Fiora on there.
 
When she is finished she can stand alongside these fellows...


I also plan to make some tiny swords for these at some point.
 
I have too many plans.
 
So, for now I shall bid you adeiu and I'll update here when I do something noteworthy!
I am not posting a list of links this time as the collossal amount of links will be longer than this post, which frankly is amazing considering how apocalyptically long this post has been.
Speaking of which, congratulations surviving the apocalypse!
 
Oh, and Merry Christmas...
 
And in 50 minutes, Happy New Year!
 
Toodle-pip for now!